
الجمعة، 3 ديسمبر 2010


Create an Ink Splattering Knight Composition
In this tutorial, we will see how to use Photoshop filters and brushes to create an ink splattering knight composition. This is a relatively simple technique, which yields excellent artistic results.
Preview of Final Image

Create a new document of size 600×800. Resize and place your downloaded Knight into the document as shown below.

Select the Knight layer and create a Layer Mask. Using the Brush tool with black color, paint on the unwanted areas in the mask to crop the Knight out of his background. After you are done, go to Image > Adjustments > Desaturate.

Place the downloaded texture behind the Knight. Select the texture layer and go to Image > Adjustments > Destaurate. Reduce the Opacity of this layer to 20%.

Hide the Knight layer temporary. Download Watercolor Splatter Brushes from QBrushes. Load the downloaded brushes into Photoshop and paint a few splatters with black color as shown below. Hide the Splatters layer once you are done.

Unhide the Knight layer. Go to Image > Adjustments > Levels and key in the settings as shown.

Go to Image > Adjustments > Posterize. Key in 2 for the Levels.

Go to Select > Color Range. With the color picker, click on white color in the document to select all the white areas.

Unhide the Splatters layer and create a Layer Mask with the selection loaded in the earlier step. Hide the Knight layer.

Add some smaller splatters around border of the ink knight to break from the original shape.

Unhide the Knight layer. Reorder layers so that the Knight layer is at the top-most. Select the Knight layer and go to Filter > Stylize > Glowing Edges. Key in the settings as shown below.

Go to Image > Adjustments > Invert. Set the Blend Mode of Knight layer to Multiply. You will get a nice outline of the originial knight image.

Create a new layer and add a large red splatter as shown below.

Create a new Levels Adjustments Layer. Set the values as 49, 1, 255.

Add in your texts with a font that matches the overall theme.

Finally, flatten all the layers and go to Filter > Sharpen > Sharpen to bring out more details. That is all, I hope you enjoyed the tutorial. Thanks!
Create a Face Paint Dripping Effect
Preparation:
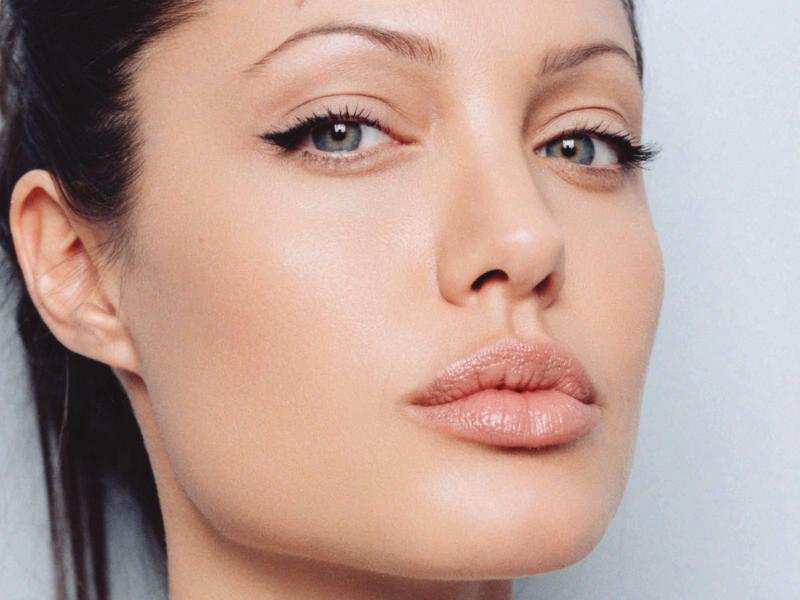
We need a face image of Angelina Jolie here. Also we need a dark background to create a nice contrast with the face color. I’m using Dark Wood Wallpaper from zygat3r.
Download Angelina Jolie.
Download Dark Wood Wallpaper.
All rights of these resources belong to their respective owners.

Step 1 – Setting Up Background:
Create a document of size 900×660 pixels..
Open up the Dark Wood wallpaper and resize it to fit into the document.

Step 2a – Cropping out the Face:
Open up the image of Angelina Jolie and place it into the document as shown in the diagram.

Step 2b – Cropping out the Face:
Using the Eraser tool, remove the background and both eyes of the image.
Alternative Method:
Instead of using Eraser tool, you may create a Layer Mask for the face layer. Painting with #000000 to mask the unwanted areas. And #FFFFFF to reveal.

Step 3 – Removing Facial Hair:
Selecting the Face layer and go to Filter > Blur > Surface Blur. Enter 5px for Radius and 8 levels for Threshold.
Create a new layer and name it as Cover. Using Eye Dropper tool, pick a color around the facial hair.
Then select the Brush tool, set its opacity to 30% and size to 25pt, paint on Cover layer to hide the unwanted hair.

Step 4 – Removing Half of Face:
Using the Eraser tool again, remove the bottom half of the face like the one shown in the diagram.
Remove the left ear as well.

Creating a new layer and name it as Drips.
Using the Eye Dropper tool, pick a color close to the bottom border. Then use the Brush tool to paint downwards. Repeat this for several times with various Brush sizes.
Tips:
Hold down Shift key while painting to maintain a straight line.

Step 5b – Adding Drips:.
Touch up on the areas where every drip starts.
There should be nice curves in between the heads of the drips.
Merge the Drips, Cover and Face layer once you are done. Rename this new merged layer as Paint.

Step 6 – Adding Emboss Effect:
Right-click on Paint layer and select Blending Options.
Check on Bevel and Emboss. Set the Style to Inner Bevel, Depth to 165, Size to 50, Angle to 55, Altitute to 40, Screen Opacity to 0%, Shadow Color to #DCA288, Shadow Opacity to 100%. Leave the rest of the settings as default.

Step 7a – Creating Glow:
Create a new layer and name it as Glow.
Set the Brush color to #FFFFFF and size to 4pt. Create a path with Pen tool like the one shown in the diagram.
Using the Pen tool, right-click on the path drawn and select Stroke Path. Choose Brush and check on Simulate Pressure. Hit OK once you are done.

Step 7b – Creating Glow:
Duplicate the Glow layer.
Select the upper Glow layer and go to Filter > Blur > Gaussian Blur. Set the Radius to 3px.

Step 7c – Creating Glow:
Repeat Step 7a and 7b for more glowing strokes.
Focus the glow on the right borders only as the light source comes from that side.

Step 8 – Adding Glitters:
Create a new layer above the rest and name it as Glitter.
Using the Brush tool with color #FFFFFF and size 2pt, paint a cross. Then use the Airbrush Eraser tool with size 65pt, fade out the four edges of the cross.
Duplicate a few of the Glitter layers and spread them over the face.

Optional:
At the end, I added some texts with the similar emboss effect. Hope you have enjoy the session. Thanks!
Click here to view the final image.

الاشتراك في:
الرسائل (Atom)